Monday, October 12, 2009

Philosophy of Art Education

Art is a universal language of visual and verbal communication. This language can be understood by anyone who is willing to learn. As an art educator, it is my responsibility and privilege to reach students who have not communicated through the arts, and encourage those who have. In the classroom, I will embrace each student as an individual, challenging him or her accordingly. I will promote imagination, problem solving, creativity, and understanding of personal expressions.

Although some assert that art does not serve a purpose in other areas of academic learning, art can increase ones knowledge of a foreign subject matter. Issues that are unrelated to art may be brought into the classroom and resolved in a visual context. Students will then be more aware of the issue because of physical involvement.

Students should be able to express themselves not only verbally, but visually. My goal is to have each student's voice heard through visual arts. I wish to give students the knowledge that I have learned from previous educators, the confidence to express one's thoughts or feelings without embarrassment, and an appreciation for arts and its purpose in society.

Sunday, October 11, 2009

Sense of Place

A "sense of place" can mean many things: a place where a person is not judged, a stress free environment, an object that is comforting. To me, the term means a place/object of security or belonging. My sense of place is my home.
I took an image of my house, placed it inside a clear plastic job ticket holder, and traced the house with a black permanent marker (top left). You can then take the image out and replace it with a white sheet of paper to see the silhouette only (bottom left).


Dina DiTaranto, Sense of Place Silhouette, Permanent Marker on Plastic

I decided that the use of the ticket holder was an excellent way to show a silhouette in and out of its environment. The sense of place can be seen in two different scenario, and have to different but personal meanings.

Saturday, October 10, 2009

Sense of Place: Silhouette Lesson Plan for Web Viewing

Teacher: Ms. Dina DiTaranto
Title: Sense of Place: Silhouette
Grade Level: 6th grade
Background/History:
Silhouette cutting began during the 17th century. Silhouette artists were hired as entertainment for the royal court making free-hand cuttings of lords and ladies in their elaborate attire. Silhouettes are named after the French Minister of Finance in 1759, Etienne de Silhouette. Mr. Silhouette was a miserable man who brought sadness to the French through his unfair tax policies. He did however enjoy the art of cutting silhouettes. This is where the term “Silhouette” was born.
Silhouettes migrated into Europe and became extremely popular in 18th century America. Silhouette artists were employed capture portraits of American aristocrats, politicians, and common folk.
There are only about 15-silhouette artist in the country today. Silhouettes are very beautiful, delicate, and rare. They should be looked at with great respect.
Sense of Place- A "sense of place" can mean many things: a place where a person is not judged, a stress free environment, an object that is comforting. To me, the term means a place/object of security or belonging. My sense of place is my home.

PA Standards:
1.6 Speaking and Listening
2.3 Measurement and Estimation
4.8 Humans and the Environment
9.1 Production and Exhibition of Visual Arts
9.2 Historical Context
9.4 Aesthetic Response

NETS Standards:
1 Facilitate and Inspire Student Learning and Creativity

Goal: Students will create a Silhouette inspired by his or her own “Sense of Place”.

Objectives: Students Will:
1.) Learn the style and history of silhouettes through various artists’ examples.
2.) Observe different techniques on how to create a silhouette.
3.) Find his or her own sense of place
4.) Apply knowledge of tracing skills
5.) Create a Silhouette inspired by his or her own “Sense of Place”.

Requirements Class 1:
In-Class:
1.) Discuss “Sense of Place” and Silhouette art through examples.
Homework:
1.) Bring in a 5 x 7 black and white picture of your sense of place.

Requirements Class 2:
In-Class:
1.) Produce one silhouette on job ticket holder inspired by sense of place.
Homework:
1.) Write a one-page essay on why this silhouette is considered your sense of place.

Requirements Class 3-4:
1.) Create a frame using black paper stock.
2.) Present “Sense of Place: Silhouette” to the class, read essay.

Supplies:
-Digital Camera
-Computer and printer
-5 x 7 black and white picture of “Sense of Place”
-Clear Job ticket Holders (Staples store)
-Rubber Cement
-Black Sharpie Marker
-Eraser
-Scissors
-Ruler
-White Paper (Letter)
-Black Paper stock (Letter)
-Extra 5 x 7 images (Backup)

Teacher Preparation:
-Hand out supplies: clear job ticket holder, black sharpie marker, ruler, eraser.
-Through a power point presentation, discuss the history and examples of silhouette art.
-Create exemplar of various silhouette artists’ work.
-Show a demonstration on how to create the silhouette by tracing the sense of place.

Introduction to Lesson:
-What is a silhouette?
- Define silhouette
- Discuss history, style.
- What is “Sense of Place”.
- Define personal “Sense of Place” and discuss other options.
-Show examples of different ways to create a silhouette through various artists’
- Pictographs
-Tim Knoble and Sue Webster
- iPod
- Kara Walker
-Am Baile
-Show a demonstration on how to create a silhouette by tracing the “Sense of Place”, and construction of frame.

Directions:
Class 1:
1.) Introduction to “Sense of Place” and Silhouette (Follow Introduction to Lesson)
Homework:
1.) Bring in a 5 x 7 black and white picture of your sense of place.
Glue image on the center of a white sheet of paper, or print the image centered on a white sheet of paper.

Class 2:
Silhouette:
1.) Briefly discuss “Sense of Place” and Silhouette for a refresher.
2.) Place 5 x 7 image into the top right hand corner of the clear job ticket holder.
3.) Carefully, trace the object that is considered your personal “Sense of Place” with a Black Sharpie marker. You may use a ruler to make straight lines. (If you mess up, an eraser will take off the Sharpie marker from the ticket holder.)
4.) Remove the image from the job ticket holder and replace it with a white sheet of paper. You can see the difference when an object is taken out of its environment.
5.) After you are done reviewing the silhouette on the white paper, slip the black and white image (on top of the white paper) into the top right hand corner so the silhouette and the image line up.
6.) Measure, mark, and cut ¾ in. out from the edge of the image on all sides.
7.) Take clear tape and tape the top, bottom and right sides so the ticket holder is made like a pocket to hold the images so they don’t fall out. Leave the left side open so you can rotate between image and white background with silhouette.
Homework:
1.) Write a one-page essay on why this silhouette is considered your sense of place.

Class 3-4:
Frame:
Create a frame out of black cardstock, 7.5 x 9.5 in. with a 5.5x 7.5 in. opening in the center.
1.) Measure, mark, and cut a rectangle 7.5 in. wide and 9.5 in. tall.
2.) Measure, mark, and cut 1 in. in from all sides. This will create the 5.5 x 7.5 in opening.
3.) Take frame, cover the back with rubber cement,
4.) Center the opening on the image leaving a ¼ in. white border visible.
Presentation:
1.) Present “Sense of Place: Silhouette” to the class, read essay.

Closure/ Evaluation:
- Students will present “Sense of Place” Silhouettes and essay individually.
- Did students fulfill all requirements accurately?

Extensions:
- Students may help others who are not finished or begin writing the one-page essay on why his or her silhouette is considered their personal “Sense of Place”

Time:
Class 1:
20 minute – Introduction/ Power Point Presentation on “Sense of Place” and Silhouette Art.
2 minutes – View exemplar of cut out silhouettes
15 minutes – Show demonstration of how to create a “Sense of Place” Silhouette by tracing, and construction of frame.
3 minute – Assign Homework
5 minute – Clean up

Class 2:
2 minute – Introduction
35 minute – Work period
3 minute – Assign Homework
5 minute – Clean up

Class 3:
2 minute – Introduction
20 minute – Work Period
5 minute - Clean up
13 minute – Student Presentation/Evaluation

Beginning of Class 4:
15 minutes - Finish Student Presentation/ Evaluation
3 minute – Closure to lesson

Vocabulary:
Sense of Place- The term sense of place has been defined and used in different ways by different people. To some, it is a characteristic that some geographic places have and some do not, while to others it is a feeling or perception held by people (not by the place itself). It is often used in relation to those characteristics that make a place special or unique, as well as to those that foster a sense of authentic human attachment and belonging. Others, such as geographer Yi-Fu Tuan, have pointed to senses of place that are not inherently "positive," such as fear.[1] Some students and educators engage in "place-based education" in order to improve their "sense(s) of place," as well as to use various aspects of place as educational tools in general
Trace- A reproduction made by superimposing a transparent sheet and copying the lines of the original on it.
Silhouette- 1. A drawing consisting of the outline of something, especially a human profile, filled in with a solid color. 2. An outline that appears dark against a light back

Safety Concerns: Caution when using scissors.

References:
- Silhouette Artists
- Definition of Sense of Place
- Definition of Tracing
- Kara Walker: Silhouette Artist


Friday, October 9, 2009

eLecture: Painting Under the Knife

Painting with a knife has different results when compared to a brush. Painting knives are an excellent choice when producing textures, impasto, highlights, smooth surfaces, and much more. Painting knives can be used with oil or acrylic paints

Google Image: Copy write Ken Bromley Art Supplies. Click image to enlarge.

History

A New England artist and teacher named Charles Hawthorne created the first palette knife. He taught his students to use thick broad strokes in their paintings with a putty knife. This tool was developed into a palette knife, which today comes in different heights, widths, and shapes and are known as Painting Knives. Today, the term palette and painting knife are used interchangeably.

The painting knife was very popular with Impressionist painters. Claude Monet, Pierre Auguste Renoir, Edgar Degas, and Paul Cezanne are just some of the established artists who use this technique. Impressionism was a type of painting style that would capture visual reality in terms of color and light, not lin
e and form.

Impressionism:
- Captures light
- Captures time of day or mood
- fast, quick little strokes
- Keep colors seperate

What is a Painting Knife?
A painting knife is a springy, shaped, metal spatula attached to a wooden handle. Painters use this tool instead of brushes to create different effects. This technique is like applying peanut butter on bread. The knife can create thick applications of paint creating textures that brushes can
not.

Spring or Not to Spring?
Spring! A painting knife should be flexible in the blade. If the blade does not bounce back immediately, it is not a good quality knife. The more flexible the knife, the easier it will be to create texture. As you can see in the picture below, a narrow blade has more flexibility than a wider blade. Th
e wider blade would be better used to spread large amounts of color. Learn more about the quality of painting knives


Image: Copy write 2008 Marion Boddy-Evans.
Click Image to enlarge.

Painting Knife Shapes:
As you can see in the image at the top of the page, there is a great variety in the shapes of knives. Each knife, depending on the way it is used, creates different effects. Short blades make angled strokes, while long blades make it easy to place a large amount of color to the canvas. Rounded edges make it almost impossible to cut through canvas so it is acceptable to scrape into the paint with an edge. Although there are several knives to choose from, you typically would need only three of four, but it is hard to resist starting a collection.

Learn more about Knife Shapes

Applying the Knife to the Canvas:
Take the knife, scrape the paint up onto the knife from your
palette. You may hold the knife however is comfortable, ut just make sure it is supported. Press the painted side of the blade onto the canvas. It’s that easy! If it is your first time using the knife. Experiment with different marks and textures on scrap canvas.
See Mark Making with a Knife

Image: Copy write Vladimir Godnik/moodboard/Corbis. Click image to enlarge.

Care for the Painting Knife

When you are finished painting, wipe away any paint that is left on the knife with a cloth or paper towel. It is much easier than cleaning brushes. If paint dries on the knife, just chip it away with another blade. Should the tip if a blade break, do not throw the knife away just yet. See if you can round the edge and make a new knife out of it.

Pre-planning
Pre-planning a composition is very important. The best way to do this is to create a series of thumbnail sketches. After deciding which composition to use, lightly sketch it onto the canvas using correct proportions and depth. Also, create several color thumbnail sketches to select the correct color palette for the painting.

Learn more about mixing colors

Techniques:

Texture:
Texture is usually created with a large, wide knife with mounds of paint on the blade. The paint is smoothed onto the canvas like icing on a cake. Lifting the blade slightly off the canvas while moving the tool can create fluid ridges that can start the beginning of a painting. It is important to remember to work wet-on-wet. This technique will not work on dry paint.

Layers:
You can create layers by starting with the darkest color and layering ov
er a portion of the last swipe with a lighter color. You can use small quick strokes or long flat strokes.

Adding Detail:
Adding small amounts of paint on the top layer can create highlights. Scraping away paint, or sgraffito, can create lines, and movement. The way the blade leaves strokes of paint can also create movement.

Color Palette:
It is very important to choose a color palette for a painting. Of course you can add colors that are not on your palette, but it is a good idea to get obvious colors and shades of those colors mixed. The colors chosen will give the image a three dimensional look, as well as movement and characteristics.

Mark Making With a Knife: This page will show you all different ranges of marks that you can not create with a brush. The each mark mad by a knife in unique.


This is a painting of my teddy bear. I used a brush for the background, but most of the painting was done with the painting knife. I chose the brush to do the background because I did not want to take away the focal point of the bear. By Using the techniques above, I was able to create this painting. Notice the direction of the knife strokes. It really gives the bear a sense of three dimension, and movement, which also comes from the choice of color palette. He has certain characteristics that pop which can make this painting a self portrait.


Image: Copy write 2008 Dina DiTaranto. "Teddy" Oil on Canvas. Click image to enlarge.


Questions for Discussion:
What is Impressionism and who are some famous artist
s from that era?

How should you pre-plan for a painting?

Why is a color palette important?

What is Sgraffito?

What is Impasto?

How do you clean the knife?


This is a triptych painting I created of Laguna Beach, done with the painting knife. Notice the short strokes and layers of paint used. Values of color are what make the image come to life. This is the style activity that you will be doing.


Image: Copy write 2008 Dina DiTaranto. "Laguna Beach" Oil on Canvas. Click image to enlarge.

Activity: Impressionistic Landscape

Materials Needed:
- Canvas
- Oil Paints
- Painting Knife (or knives)
- Thinners
- Picture of landscape

Directions:
- Choose an impressionistic landscape painting from one of the following, or do research and find your own.
Starry Night, Vincent Van Gogh
Water Lilies and Japanese Bridge, Claude Monet
Impression Sunrise, Claude Monet
View of Bougival, Pierre Auguste Renoir
Artist in Plein Air, Charles Hawthorne

- After choosing the painting, Review the artists style. Take notes on use of color, texture, thickness of paint, how the knife was used either large fluid strokes, or short tiny strokes, etc.

- Take a picture or find a picture of a landscape that appeals to you. Create a series of 5 thumbnail sketches (pencil and paper). Choose to do the whole image, or crop a section of the image.

- Pick the composition you like the most and lightly sketch it onto canvas (canvas size is your decision).

- With oil paint, create a color palette (Use different thumbnails to choose which colors will work the best).

- Use the painting knife only, and with the inspiration of the famous painting you reviewed, create your own impressionistic painting! NO BRUSHES!!

Thursday, October 8, 2009

WebQuest: Party Planning for the Non-Profitable

Have you ever wanted to be a Party Planner? Well now is your chance. You will be planning a party to raise money for a chosen non-profitable organization.

Task:
You will create a design brief by researching and answering questions about your chosen client. Based on your knowledge, you will then search the internet to find the perfect hall or restaurant for a dinner party of 200 guests, and create a three dimensional invitation that best represents the organization.
This is your chance to convince donors why they should contribute to this organization. , so do your research! Don't just look at the website, search further by visiting partners and affiliates. The better you know your client, the better your product.

Process: Requirements:
1.) Find out what a Non-profitable organization does.

2.) Choose a client from this list of Non-profit organizations.

3.) The 5 W's -Who, What Where, When, Why.
Create a Design Brief based on the following questions:
What is the Organizations name?
What is their Mission?
What accomplishments have been made?
What are the problems they face?
What is their Goal?
What do they wish to convey toward their donors and contributors?
What is the solution? (Hint: this is the event you are planning, What is the name of the event?)


4.) Search the web and choose a restaurant or hall to hold your event.

5.) Select three dinner items to place on your response card (you may give the items interesting names that incorporate the organization, but be sure to give a description of t
he food). These choices should reflect your clients organization.

6.) Choose appropriate typography and color scheme for the Invitation (Any materials may be used including Adobe Photoshop, Illustrator and InDesign. Just remember, these would be sent in the mail, so if something could spoil or rot, that's not good!)

7.) Create a 3-Dimensional Invitation including the following:

-Invite: Name of organization, Cordially invites (name of guest(s) ) to (name of event, where, when, price) The proceeds of this event will (what will the proceeds go toward).

-Create a holder or a unique design to place Response
Card, Envelope, Directions Card, About the Organization Card, and Event Information Card.

-Response Card and Envelope (3 1/2" x 5" minimum US envelope size)
On the Response card:
Name of event
Guest Name(s):
Menu items and space to mark the # of items:
Total Ticket Price:
Credit Card #:
Check Made Payable to:
Questions? call: (name, #)
(optional: add a slogan)

- Envelope: Return label in the center (Organization, address)
- Directions Card: Restaurant or hall address and phone number.
- About the Organization Card: What is their mission? What do they do?
- Event Information Card: Come join us at the "Event Name" for . . . promote the event, what will be happening (i.e. dinner, music, dancing, games . . .)

8.) Presentation
You will present your invitation and design brief to your class. Discuss the event and what would take place. How will this event benefit the organization? You should be well versed and knowledgeable of the organization do to research.


Evaluation:


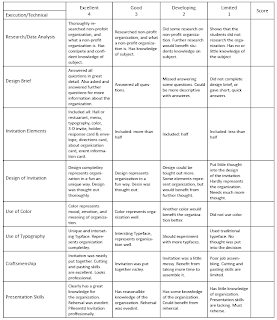
You will be graded on:
- Research/Data Anaysis
- Design Brief
- Invitation Elements
- Design of Invitation
- Use of Color
- Use of Typography
- Craftsmanship
- Presentation Skills


Conclusion:
Your finished project should be completely unique and original, including all requirements.

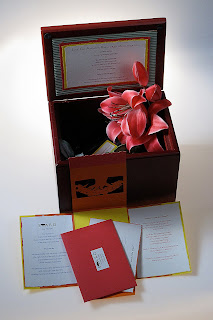
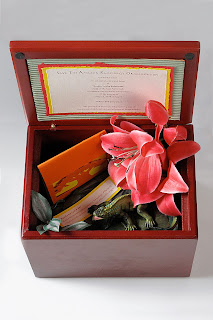
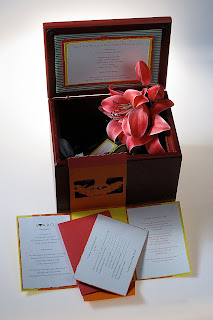
Here is an example of an invitation made for a non-profitable organization called STARO (Save the Rainforest Organization) The Event was called "Rockin in the Rainforest" and held at the Rainforest Cafe in Atlantic City, NJ. All proceeds of this event will preserve a plot of the Amazon Rainforest, saving the homes of forest dwellers. In the Invitation box, a little lizard can be found with a Rainforest Fact attached to its foot. The menu included Rasta Pasta, China Island Chicken or Fish, and Paradise Pizza. The slogan, "You'll Have A Wild Time"


All images copy written, photographed by Dina DiTaranto

Credits:

Teachers:
This WebQuest is designed for the high school level, and involves research, a design brief, and the use of the elements and principals of graphics design and art. Technology such as Adobe Photoshop, Illustrator or InDesign may be used to enhance the product.


Wednesday, October 7, 2009

Everyone Can "Do" Art

"I can't draw." or "I'm bad at art."... Any of these sound familiar?

Some of you may have heard this from a friend, or some of you may have said it yourself. Either way, art isn't just about the principles of design. Art is the freedom of expression, and how you interpret a painting or drawing can influence other people. It may not be the Sistine Chapel, but if your message is getting across, you have accomplished a very important artistic quality. You have made someone stop, contemplate and come to a conclusion about what your work is saying. Think about it... that's pretty impressive.